REVIEW · MALTA
Workshop: Maltese Souvenir Tile Design Experience
Book on Viator →Bookable on Viator
Handmade tiles beat museum souvenirs. This small workshop turns Maltese culture into something you can touch in Marsa with Clive. You’ll learn how local tile patterns evolved, then go from design idea to a finished plaster-and-cement tile you can actually use at home.
I especially like the hands-on flow: research and pattern choices first, then mold-making and painting with quick-dry acrylics. You also get a full cultural chat as you work, so it’s not only about the craft—it’s about why these designs matter in Malta. One small thing to consider: the tile is air-dried (not oven-baked), so treat it gently while it cures and follow the studio’s handling guidance.
In This Review
- Key points before you go
- Why this Maltese souvenir tile class feels different
- Where you meet and how the session is set up
- The step-by-step workshop: from Maltese tiles to your own pattern
- 1) Learn what Maltese tiles are (and how they’re used)
- 2) Choose or design your motif
- 3) Make the mold using plaster or white cement
- 4) Transfer the design into the mold
- 5) Paint with acrylics (quick-dry)
- 6) Take your tile home
- Air-dried cement tile: what that means for your souvenir
- What to expect when you meet Clive in his studio
- Price and value: is $35.95 worth it?
- Best for whom: couples, families, and first-timers
- Logistics that actually matter on the day
- Should you book this Maltese tile workshop?
- FAQ
- How long is the Maltese souvenir tile design experience?
- Where do I meet for the workshop?
- Do I need to be an artist to participate?
- What size is the tile I make?
- Are the tiles baked in an oven?
- Does the price include photos?
- Can I make an extra tile?
Key points before you go
- Marsa studio setting: It’s in a traditional house art atelier, so it feels personal, not tour-bus generic.
- Real process, not just painting: You’ll create and transfer your design using plaster/white cement steps.
- A usable keepsake: The finished tile is about 10 x 10 cm, sized to work as a coaster souvenir.
- No art background needed: It fits beginners and advanced people since you’ll get step-by-step help.
- You leave with photos: Photo coverage is included, plus the tile goes home with you.
- Optional add-on tile: If there’s time, an extra tile can be made for 3 euro.
Why this Maltese souvenir tile class feels different
If your Malta plans include the usual sights, this is the antidote: an indoor activity that’s still very local. Instead of just looking at the Maltese eye-catchers from a distance, you get to make one. That matters because Maltese tiles aren’t only decoration—they’re a visual language you can study, copy, and then personalize.
The workshop is run from a small studio in Marsa (inside a traditional house). That alone changes the mood. It’s quieter than the big attractions and you can hear the explanations clearly. Clive also brings a local-art angle while you work, which turns the time into more of a conversation than a classroom lecture.
Two things make it especially satisfying: you’re not only painting a ready-made design, and the final object has a practical purpose when you get home. It’s not just a showpiece. The tile size makes it easy to keep on your desk, kitchen counter, or coffee setup.
A few more Malta tours and experiences worth a look

Where you meet and how the session is set up
You’ll meet at 23 Gizwiti, Il-Marsa MRS 1562, Malta. The activity ends back at the same point. The session is about 2 hours total and is private—only your group.
Two practical notes that can save time:
- Google Maps can be confusing here, because there are multiple places numbered 23 in the area. If the pin looks off, don’t panic—use the street context around Il-Marsa.
- The studio is described as near public transportation, which helps if you’re juggling bus schedules or walking between neighborhoods.
You’ll also want to plan for a straightforward comfort setup: dress comfortable. You’ll be handling materials and painting, so clothes that can tolerate a little mess are smart.
The step-by-step workshop: from Maltese tiles to your own pattern
This is the kind of class where you can watch your own learning happen in real time. You start with a short historical context on Maltese tiles, then you move into the making process. Clive guides you through each phase, from concept to realization, and you’ll see how the pattern becomes physical form.
1) Learn what Maltese tiles are (and how they’re used)
Before paint touches anything, you get a brief explanation of Maltese tile traditions. This isn’t a long academic talk. It’s aimed at helping you understand what you’re recreating and what makes certain patterns recognizable. If you’ve ever wondered why some Maltese designs look so distinct, this is where that clicks.
2) Choose or design your motif
Next comes the creative choice. You can use designs available in the studio or create your own pattern concept. For most people, the easiest win is picking a traditional option and making it yours through color choices and small adjustments.
Clive will help you move from “I like this idea” to “here’s the design plan.” That matters because tile patterns reward structure. Even if you’re a beginner, you’ll end up with something coherent.


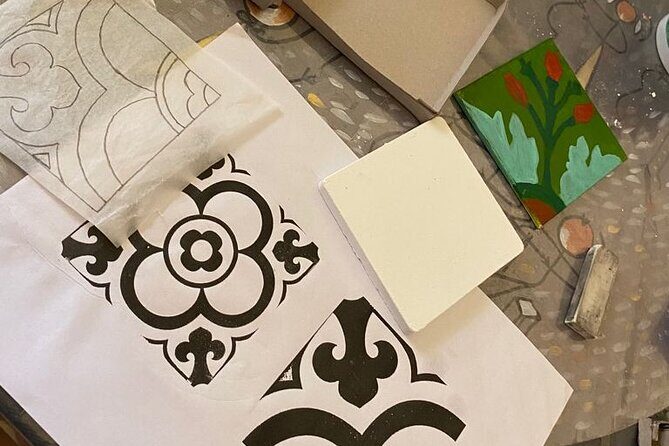
3) Make the mold using plaster or white cement
Then you shift into the craft side. You’ll create the mold using plaster or white cement, which turns your pattern into a physical template. This is one of the most interesting phases to watch and participate in because you’re not guessing anymore—you’re working from a method.
This also explains why the tile ends up as a solid souvenir rather than a flat print. You’re building the object using a process designed for repeated pattern-making.
4) Transfer the design into the mold
Once the mold is ready, the design gets transferred. This is the moment your motif becomes part of the tile itself. It’s also where patience pays off, because small alignment choices are what make a pattern look crisp.
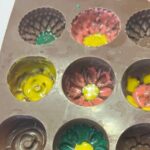
5) Paint with acrylics (quick-dry)
Finally, you paint. You’ll use acrylics, and the big practical benefit here is that acrylics dry quickly, so you don’t spend the entire session waiting. You get time to layer or adjust colors without the long pauses that can make a workshop drag.
Clive helps you along the way, so it doesn’t turn into a test of artistic skill. It becomes more like guided craft.
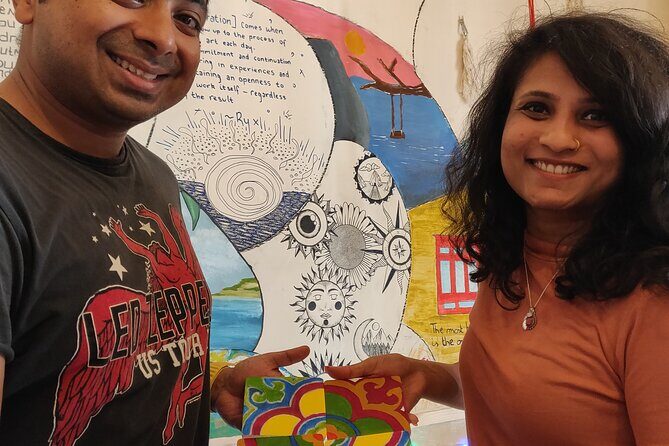
6) Take your tile home
At the end, you keep your tile. It’s air-dried and made with cement as described by the studio. The tile’s intended use is clear: it’s sized around 10 x 10 cm, which works as a coaster-style souvenir.
One more useful detail: you’ll have photos included in the price. So even if you’re concentrating on the hands-on work, you can still get documentation for memories and your next coffee table brag.
Air-dried cement tile: what that means for your souvenir
The tile is not baked in an oven. It’s air dry and made with cement (as explained in the workshop details). That affects how you should treat it after the class.
Here’s what I recommend in plain terms:
- Handle it gently at first, since air-dry cement projects can be more sensitive than oven-fired ceramics during curing.
- When you get home, keep it away from heavy knocks and use a flat surface for storage.
If you want your tile to stay looking sharp, treat it like a crafted object, not a mass-produced trinket. The upside is that this approach helps keep the workshop hands-on and true to the materials described in the session.
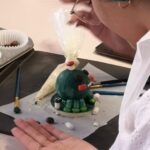
What to expect when you meet Clive in his studio
This class has an easygoing, creative atmosphere. The studio is described as small and tucked inside a traditional house, and it has an eclectic, art-atelier feel. That makes it comfortable if you like a workshop vibe.
Clive comes across as warm and patient, and the tone stays helpful rather than strict. You’ll get guidance on technique, plus you’ll have room for questions. From the experience notes, people talk about learning about Malta art and culture during the session, not only how to paint the tile.
I also like that the pace seems guided rather than rushed. You’re doing multiple steps—mold work, transfer, painting—and the structure means you’ll know what comes next without feeling lost.
And yes, there’s a small bit of fun baked into the day (especially around seasonal moments). For example, during one holiday timing (near Easter), the host shared Maltese baked snacks. That isn’t guaranteed for every date, but it’s a good sign that the experience isn’t sterile.
Price and value: is $35.95 worth it?
At $35.95 per person for roughly 2 hours, the value depends on what kind of souvenir you want.
Here’s the honest math of the experience:
- You’re paying for a complete craft session: explanation, pattern work, mold creation, painting, and a finished 10 x 10 cm keepsake.
- You also get photos included, which helps you remember the process (and not only the finished product).
- The tile is made during the workshop using cement/plaster methods described in the session, so it’s not a pre-made item you decorate in ten minutes.
If you’re comparing it to a museum ticket or a general walking tour, this isn’t about checking boxes. It’s about buying a skill + an object. If that’s your style—learning by doing—this price starts to feel fair.
The optional extra tile (3 euro) can also make it a better deal for friends or couples who want matching souvenirs.
Best for whom: couples, families, and first-timers
This workshop is built for a wide range of people. The details say it’s ideal for both beginners and advanced, and the structure supports that. Beginners get step-by-step help. More experienced artists can enjoy the design choices and painting time.
It also works well for:
- Couples who want a shared activity that doesn’t feel like a chore.
- Families, since it’s an indoor class and you can participate without being “good at art.”
- Craft-curious travelers who want something more personal than a postcard.
If your group has different comfort levels with creative work, you’re still in the right place. The guidance you receive helps keep everyone moving through the same sequence.
Logistics that actually matter on the day
A few practical tips so you show up ready:
- Dress comfortable. You’ll be working with materials and painting.
- Bring a mindset for hands-on making, not strict museum-style observation.
- If you want the most out of the cultural part, come prepared with a couple questions about Maltese art patterns or everyday life in Malta.
Language is listed as English, and the ticket is mobile. The experience is private, so it’s just your group in the studio space during the activity—another reason the time feels calm.
The experience also notes good weather is required. That might sound odd for an indoor class, but it often ties to how the day is scheduled and how the supplier operates. If weather affects the session, you’ll be offered a different date or a full refund, according to the experience rules.
Should you book this Maltese tile workshop?
I’d book this if you want a Malta souvenir with a story—one you made yourself. It’s especially worth it when you like crafts, value learning by doing, and you want something you can use at home, not just pack away.
Skip it if you’re only looking for sightseeing time efficiency. This is a slow craft session, not a fast hit of landmarks. Also, if you’re very sensitive to air-dry cement handling, plan to treat the tile carefully until you’re confident it’s cured according to the studio’s guidance.
If you decide to go, I’d go in with a clear expectation: you’re not trying to produce perfect art. You’re creating a Maltese pattern object through a real method, with help from Clive, inside a traditional home studio in Marsa.
FAQ
How long is the Maltese souvenir tile design experience?
It runs for about 2 hours (approx.), and the activity ends back at the meeting point.
Where do I meet for the workshop?
The start and end meeting point is 23 Gizwiti, Il-Marsa MRS 1562, Malta.
Do I need to be an artist to participate?
No. The activity is described as suitable for both beginners and advanced participants, with step-by-step guidance during the process.
What size is the tile I make?
The tile is described as 10 x 10 cm, and it can be used as a coaster souvenir.
Are the tiles baked in an oven?
No. The tiles are air-dried and made with cement, rather than baked in an oven.
Does the price include photos?
Yes. Photos are included in the price.
Can I make an extra tile?
Yes, if there’s time. An extra tile costs 3 euro.